This Article describes how to add, modify or delete Auto Allocations
Add new Auto Allocation
This section describes how to add a new Auto Allocation
Steps to Add a new Auto Allocation
- Select the Transaction that you want to add an Auto Allocation rule for. If this transaction already has account details assigned to it these details will automatically be used during the creation of the rule.
- Select Statement | Add Auto Allocation from the menu
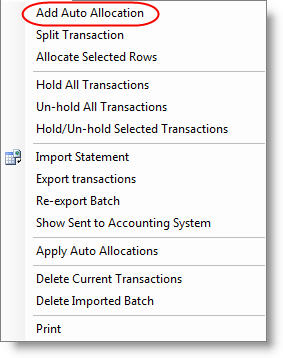
- The Auto Allocation Editor will appear.
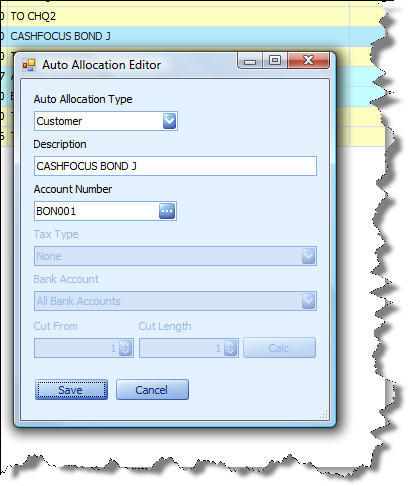
- Select the Auto Allocation Type from the drop down. These type include:
- General Ledger
- Transfer
- Customer
- Supplier
- Auto Hold
- Remove Text
- Keep Text
- Replace with Text
- Modify the description to the minimum required for the transaction's
description to be uniquely identifiable when applying the rule. It is important
to remove any bank or user specified references from the description that is
different for each occurrence of the transaction on the bank statement.
E.g.: "PAYMENT TO JOHN 23454" should rather be changed to "PAYMENT TO JOHN" if the "23454" part of the description changes every month. - Type the Account Number or find it using the Lookup by clicking on the
 button.
 - For Customer and Supplier type Auto Allocations the Tax Type will not be available.
- See below for a description on each of the Auto Allocation Types.
Edit existing Auto Allocations
This section describes how to edit an existing Auto Allocation
Steps to Edit an Auto Allocation
- Go to the Auto Allocations Tab on the Companies and Bank Accounts Tab
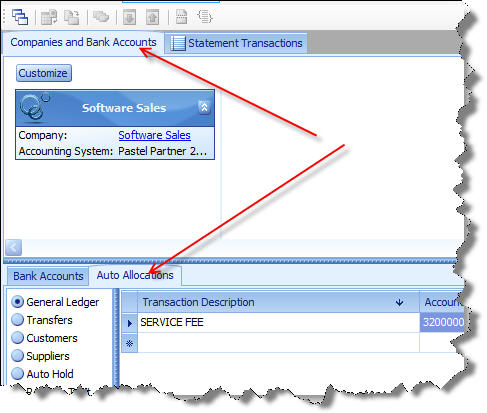
- Select the Auto Allocation Type that you want to edit by clicking of the
type in the radio group on the left of the screen.
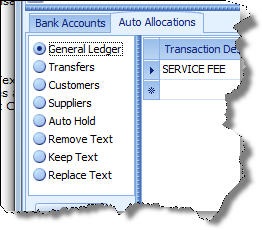
- A list of existing Auto Allocations will appear on the right.

- Select the Auto Allocation that you need to change by clicking on it.
- You can now change the value of any of the existing Auto Allocations.
- You can also invoke the Auto Allocation Editor by clicking on the Editor
button on the left just below the Auto Allocation Type radio group.
Delete existing Auto Allocations
This section describes how to delete an existing Auto Allocation
Steps to Delete an Auto Allocation
- Select the Auto Allocation that you want to delete by following the steps to edit an existing Auto Allocation as described above
- Click the Delete button on the left just below the Auto Allocation Type radio group.
Importing and Exporting Auto Allocation Rules
You can Import or Export Auto Allocation rules. This allows you to copy rules from one Company or computer to another. Rules are only exported for the selected Auto Allocation Type.
Steps to Import/Export Auto Allocations
- Select the Auto Allocation group that you want to import/export rules for by clicking on the type in the radio group on the left of the screen.
- Click the Im/Export button on the left just below the Auto Allocation Type radio group.
- Specify whether you want to Import or Export.
- If Exporting browse to the location where you want to create the export file and enter a name for the file.
- If Importing browse to the location where the import file was saved before and select the file.
- Click OK
- Click Process.
How the Rules work
The Cashbook Utility searches the imported transaction's description for the text entered in the Description field of the rule. If a mach is found, the rule is applied.
The rules are applied in the following order:
- Description Modification Rules. (Remove Text, Keep Text, Replace Text and Auto Hold)
- Account Code Allocation Rules. These rules are applied using the current transaction description. This means that if the description was modified by one of the Description Modification Rules the Account Code Allocation Rule must search for the modified description and not the original as it appeared on the Bank Statement.
Auto Allocation Types
(See GDC Type for more information)
General Ledger
These Auto Allocations will automatically assign a General Ledger account to the transaction.
Transfers
These Auto Allocations will automatically assign the Transfer General Ledger Account to the transaction and mark the transaction as a Transfer.
Customers
These Auto Allocations will automatically assign a Customer account to the transaction.
Suppliers
These Auto Allocations will automatically assign a Supplier account to the transaction.
Auto Hold
These Auto Allocations will automatically put the transaction on hold. Transactions that are on hold will not be exported to Pastel
Remove Text
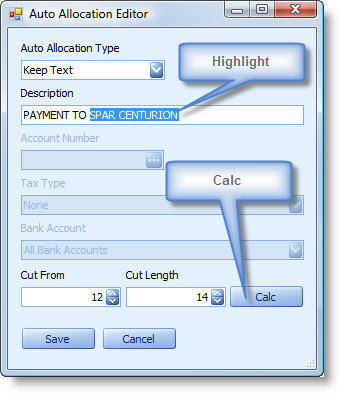
This rule removes Cut Length number of characters from the description starting at Cut From. (See below how to use the Calc button to calculate the Cut From and Cut Length.)
Keep Text
This rule keeps Cut Length number of characters from the description starting at Cut From. (See below how to use the Calc button to calculate the Cut From and Cut Length.)
Replace with Text
These Auto Allocations will automatically replace the original transaction description with the specified description.
Calculate Cut From and Cut Length
Cut From is the starting position in the description from where to Cut. If you want to start at the first character the Cut From will be 1. Cut Length is the number of characters to cut from the description. If you want to cut the first 7 characters from the description Cut From will be 1 and Cut Length will be 7.
Using the Calc Button
To use the Calc button to calculate the Cut From and Cut Length values simply
highlight the characters that you
want to cut from or keep as the description and click the Calc button. You will see the settings appear in the Cut From and Cut Length
fields.
